
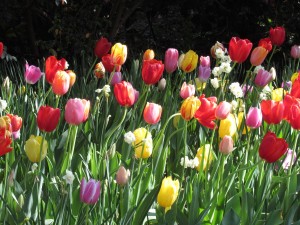
Spring bulbs such as daffodils, crocus, grape hyacinth, and tulips are in full bloom from March through May (depending on where you live). The most critical care time for bulbs is right after they finish flowering, so enjoy the display, and get your ducks in a row to give these plants a leg up on the next season.
Basic Flowering Bulb Care Tips
Always leave the foliage (leaves) standing until it fully turns brown or yellow.
While it might not be the most beautiful thing to look at, the bulb needs to replenish its food stores so that it can bloom again, and the leaves are an integral part of that process. They photosynthesize, converting light energy and water into sugars that can be stored in the plant. If they’re not allowed to do this (because you cut the leaves off), they won’t produce large blooms the following year. (They might not produce any blooms!)
Plant late-emerging perennials around bulbs to hide the foliage.
If you really don’t want to look at nothing but dying bulb foliage while plants are on the decline, you can surround them with perennials that emerge well after the bulbs. Hostas are a good example of this. They start peeking up out of the ground right around the time that bulb foliage is looking pretty ragged, and will draw the eye elsewhere—beyond the dying bulb leaves.
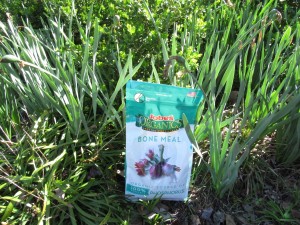
Fertilize perennial bulbs (bulbs that come back year after year) with Jobe’s Organics bone meal when the plants finish blooming.
Most people think that fertilizer provides the food (or energy) plants need in order to grow. That is not exactly true. Plants photosynthesize to make their own food for energy—that’s why you have to leave the leaves standing—but fertilizers do provide important nutrients for plants that plants use to grow, transport water and sugars, produce flowers, and so forth. If I eat a banana, I get energy and nutrients. There are sugars in the banana that give me energy, and there is also potassium, a nutrient, which plays a role in muscle contraction in my body.
That banana is from a plant. The plant did the hard work of synthesizing the energy and nutrients into one neat package. We know where the energy comes from—photosynthesis in the plant that produces sugars. The nutrients—the potassium—are taken up by the plant from the soil, and that’s where fertilizers come in. Fertilizers, such as Jobe’s Organics bone meal, have nutrients that the plants cannot make themselves, but need in order to grow.
Tulips are pretty, but they don’t perennialize well, so they don’t need to be fed in the spring after blooming.
Do not fertilize annual spring-flowering bulbs.
There are some annual summer-flowering bulbs that are worth fertilizing, caring for, digging up, overwintering in a garage, and re-planting in spring. Cannas, elephant ears, and caladium (if you have a special, hard-to-find type of caladium), are among the bulbs worth babying and carrying over to the following summer. Hybrid tulips, what you think of when you think “tulips” really aren’t. They rarely put on the same robust show for a second, third, or fourth year, even if you fertilize them. The exception to the rule are species tulips, which do perennialize. Fertilize them after the finish blooming.
How to Fertilize Bulbs with Jobe’s Organics Bone Meal
It’s time to fertilize spring-blooming bulbs when the flowers have finished but the green leaves remain.
Fertilizing your bulbs with Jobe’s Organics bone meal is simple!
- Grab a measuring spoon. It can be a regular teaspoon that you would use for eating (but wash it before you eat with it!) or a measuring spoon used for cooking. Use a spoon to help you learn how to apply the correct amount of product. (Just be cause it’s organic doesn’t mean you want to just dump the bag on a plant!)
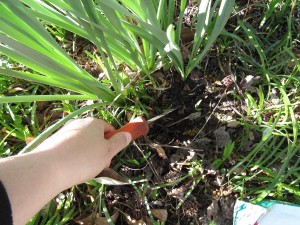
- Sprinkle the bone meal in the soil around the plant. Don’t throw it on the plant.
- Scratch the bone meal into the soil around the plant. Don’t dig heavily. Just scratch enough so that the particles are making contact with the soil. You aren’t really feeding the plants, you’re feeding the soil organisms. They will break down the bone meal into components that the plants can take up through their roots.
4.Water where you fertilized to help start the nutrient breakdown process in the soil. This also ensures that if you got some of the bone meal on the plants, it is washed off, and won’t burn the plants.
5. Measure the Jobe’s Organic bone meal fertilizer when applying it to the garden to make sure you don’t over-feed.
6.Use a soil knife, small trowel, or hand rake to scratch the bone meal into the soil.

Katie Elzer-Peters gardens in the coastal town of Wilmington, North Carolina. She grows vegetables and has extensive mixed border gardens throughout her half acre property. She has a Bachelor of Science in Public Horticulture from Purdue University and a Master of Science in Public Horticulture from the University of Delaware and the Longwood Graduate Program. Katie has written eight books about gardening for Cool Springs Press.